How to Read a Guitar Chord Chart
The first time you look at a guitar chord chart you might feel a little disillusioned. Along with learning the different finger placements, and trying to read music this might be turning out to be much more work than you imagined when you picked up the guitar, but you have already purchased a guitar, and trimmed your fingernails to play so don’t give up now. Besides in reality while they might look confusing at first a guitar chord chart is actually going to give you tremendous help in learning to play.
This chart is really just a list of the chord diagrams, which are a method of describing the finger methods you are learning to master. To truly understand how to play the correct chords on the guitar you will need to read the guitar chord chart, and after you have mastered a few songs reading and following the chart will take only a few minutes time.
This chart is really just a list of the chord diagrams, which are a method of describing the finger methods you are learning to master. To truly understand how to play the correct chords on the guitar you will need to read the guitar chord chart, and after you have mastered a few songs reading and following the chart will take only a few minutes time.
Guitar Chord Diagrams
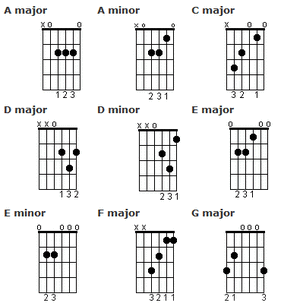
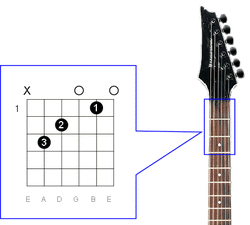
The chart is made up of guitar chord diagrams. For example, you might see a square box with four evenly spaced lines. Above this square is the letter C. Next to this letter you might see two non-shaded diamond shapes or a non-shaded dot. Inside the box you might see three shaded diamond shapes or dots.
The diamond shapes shaded and non-shaded are representing where you will place your fingers, and the lines represent the strings of the guitar. Once you find yourself looking at the diagram and seeing the guitar.
Lines and Strings
Looking at the same example as above the diagram will start to make sense when you understand that the box represents the strings on your guitar. Inside what appears to be a box there’s only four strings, but in reality the two lines at each side are also strings. What appears to be a box is representation of the all the strings of the guitar. When reading a guitar chord chart you will see exactly where to place your fingers looking at this diagram.
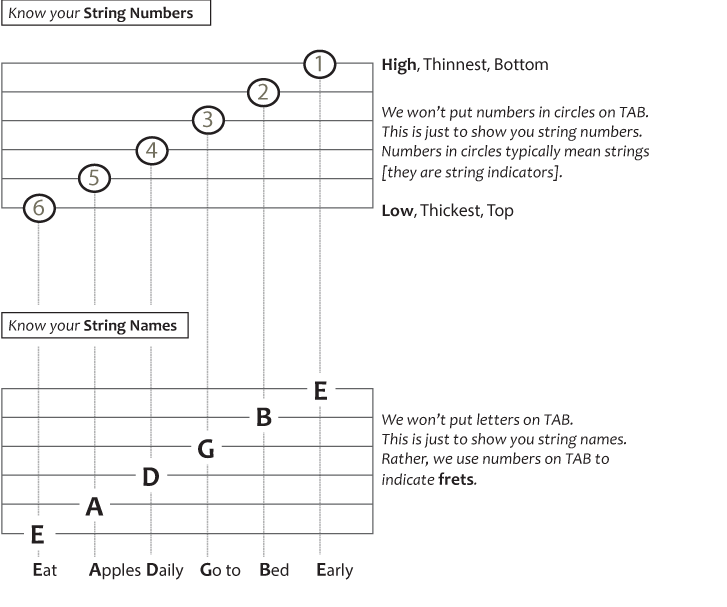
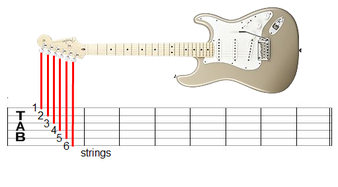
You will see the six lines of the diagram go from the left to the right, and show six lines going from the top to the bottom. The lines going across are the strings, the lines from top to bottom represents the frets on the guitar. When you look at the guitar you will see how this is an illustration of the instrument. The lines to the left are the thickest strings, while those on the right are the thinnest. In some beginning guitar chord charts those on the left are shown as thicker, but regardless of how the diagram appears always know the strings on the left are meant to depict the thickest strings.
The farthest line to the right is meant to represent the thinnest string of the guitar, which is the high E string. The line on the extreme left is the thickest string on the guitar the low E. The lines in between the thickest and thinnest show the A, D, G, and B strings.
The lines going from the bottom up show you where the frets are in relation to strings. The topmost line is an illustration of the nut of the guitar, while the bottom next line down is the first fret. As you look at the guitar and compare it to the chart’s diagram you will see the next line is the second fret and it’s easy to follow the rest of the lines to the following frets.
Looking at the same example as above the diagram will start to make sense when you understand that the box represents the strings on your guitar. Inside what appears to be a box there’s only four strings, but in reality the two lines at each side are also strings. What appears to be a box is representation of the all the strings of the guitar. When reading a guitar chord chart you will see exactly where to place your fingers looking at this diagram.
You will see the six lines of the diagram go from the left to the right, and show six lines going from the top to the bottom. The lines going across are the strings, the lines from top to bottom represents the frets on the guitar. When you look at the guitar you will see how this is an illustration of the instrument. The lines to the left are the thickest strings, while those on the right are the thinnest. In some beginning guitar chord charts those on the left are shown as thicker, but regardless of how the diagram appears always know the strings on the left are meant to depict the thickest strings.
The farthest line to the right is meant to represent the thinnest string of the guitar, which is the high E string. The line on the extreme left is the thickest string on the guitar the low E. The lines in between the thickest and thinnest show the A, D, G, and B strings.
The lines going from the bottom up show you where the frets are in relation to strings. The topmost line is an illustration of the nut of the guitar, while the bottom next line down is the first fret. As you look at the guitar and compare it to the chart’s diagram you will see the next line is the second fret and it’s easy to follow the rest of the lines to the following frets.